😆
😆


Once upon a time I said that I was gonna draw some evil stuff guys, well, I think I did in fact! I dunno if i regreting this or not
Sort of based in this prompt, because UNFFF MADNESS! this is my kink guys, i cant help that! SO SORRY!
ANYWAYSSS enjoy some asylum doctor Sandy and patient Pitch *go hides under my bed*
More Posts from Last666-blog and Others
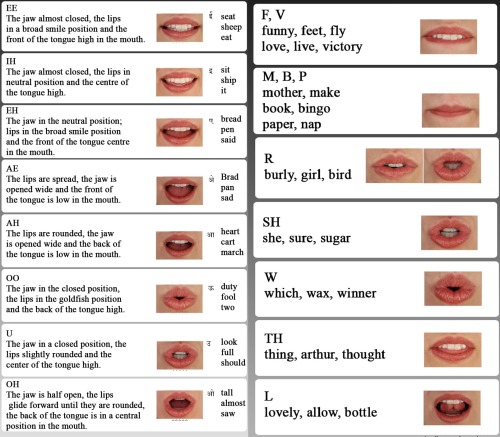
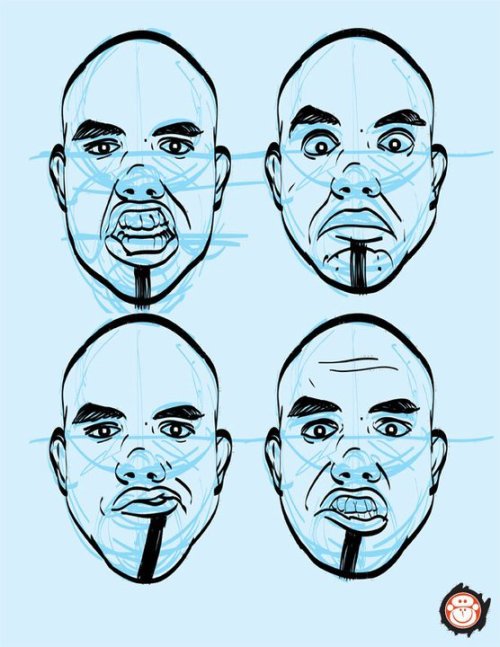
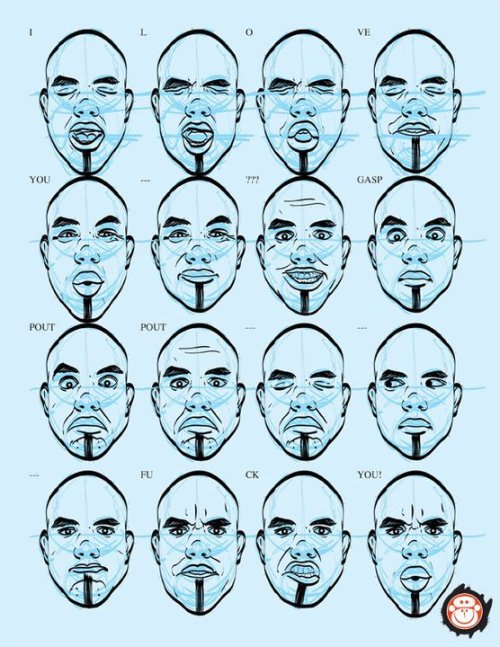
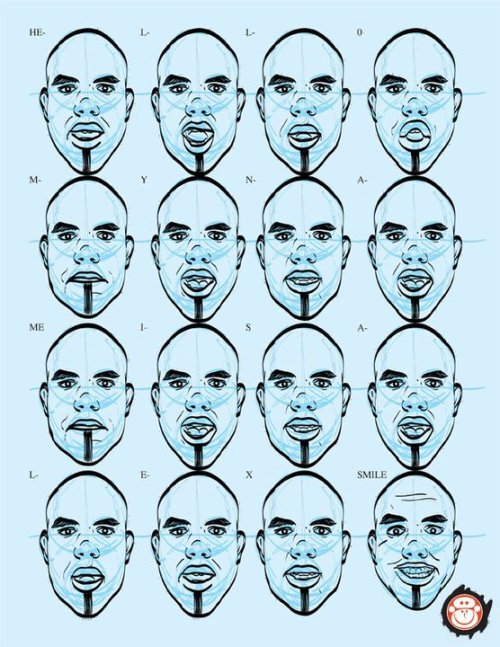
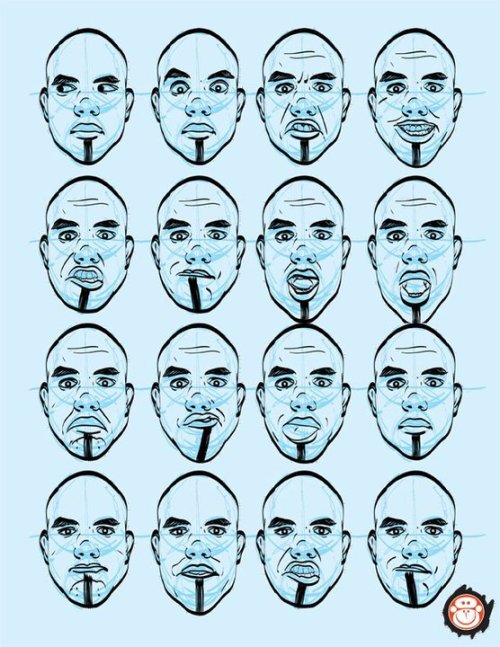
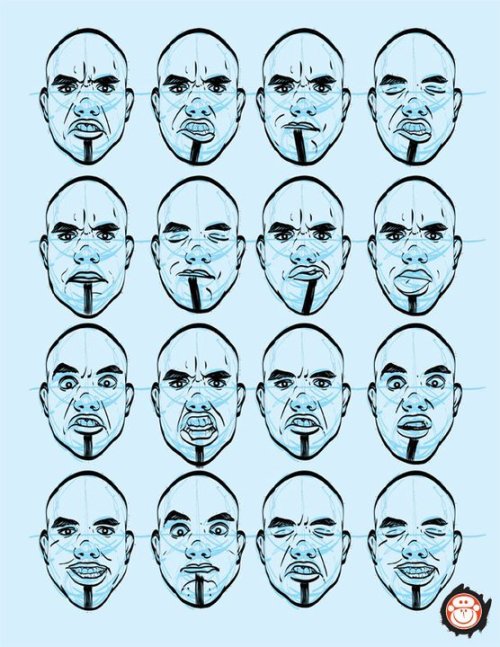
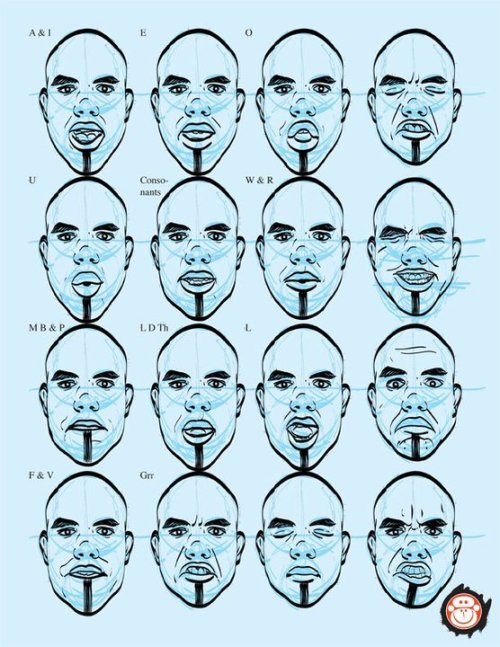
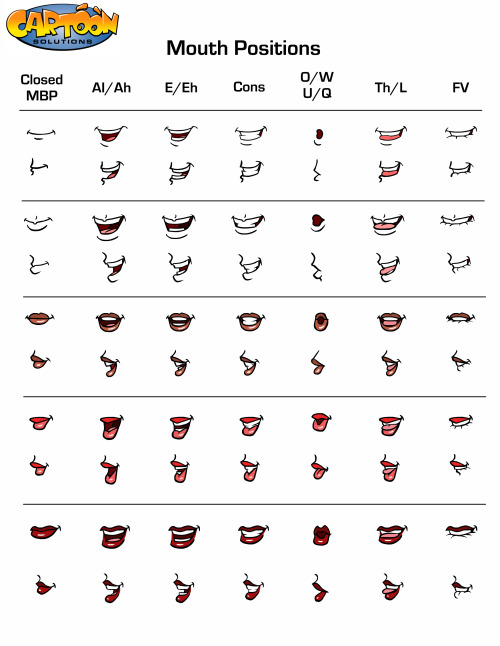
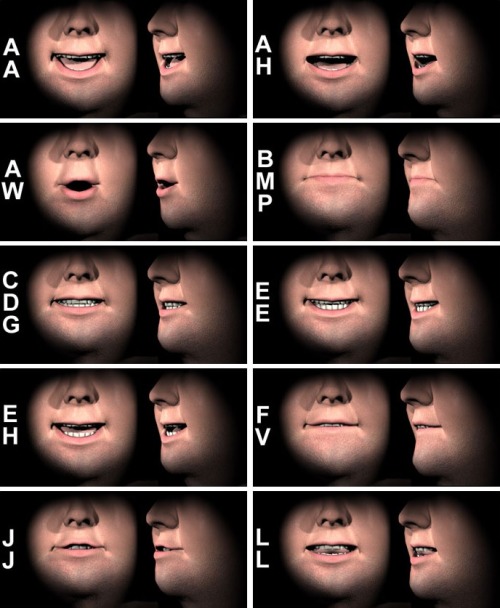
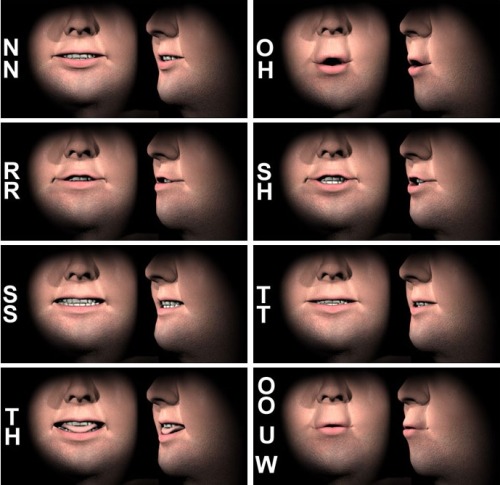
Lip Sync Tutorial Top Image Row 2 - 4 Row 5 Bottom Row


Dragon dance!!!


SHORT STORY/ONE-SHOT/ONE CHAPTER/COMICS 101 CRASH COURSE RAPIDPUNCHES’ STYLE

I’m NOT an expert but I have some working experience I can share. You need experience to become great. Here is my set of instructions, tips, and notes towards making a 12-page comic.
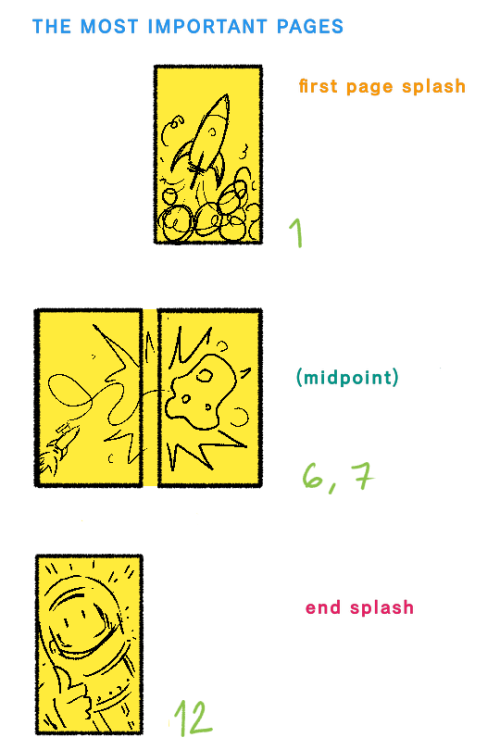
My method is to work backwards. Personally I work “backwards” because the end is the only wholly necessary page or set of panels in the story. Everything in between is open to editing and hacking as the most important moments are emphasized and chosen.
I even plan/draw the end page first. The end is the last page a reader sees- so spend your freshest energies on making it as epic, memorable, poignant, and beautiful as #$%^&.
If you draw the pages from 1 to 12 sequentially you run the risk of fresh to burnt out- an uneven distribution of drawing skill. (treat the first page and the 2-page splash as you would the last).

Roughly… the steps to making your comic is
WRITE
PLAN THUMBNAILS
DRAW
…BEGIN THE WRITING (DO NOT SKIP NO MATTER WHAT) like this, in this order:
How does it end?
Does the protag succeed or fail?
What is the turning point of their story?
What the protag do that led them there?
Where does it start?
Who is this protag?
EXAMPLE:
Guy gets mauled by a bear.
This is a fail on the guy’s half.
The bear must eat something or he’ll starve to death.
It’s the guy’s fault the bear can’t find other food. He caused the avalanche that buried all the cabins.
The guy is yodeling in an avalanche zone.
The guy is some guy.
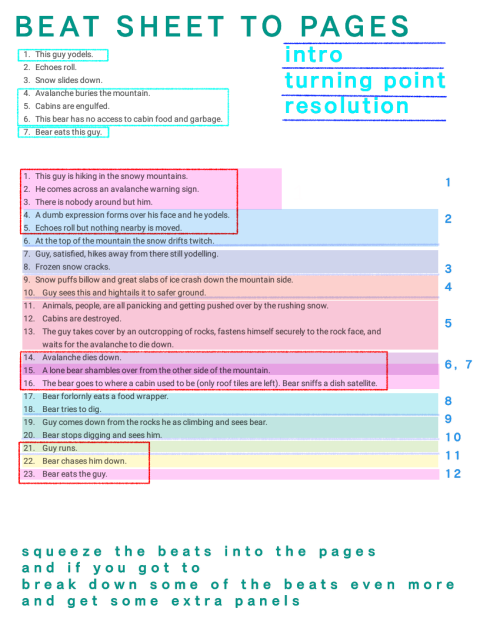
CREATING “THE BEAT SHEET” Take the above stuff and reorder it to make sense.
This guy yodels.
Echoes roll.
Snow slides down.
Avalanche buries the mountain.
Cabins are engulfed.
This bear has no access to cabin food and garbage.
Bear eats this guy.
Expand. Blow up important beats for emphasis. Keep less important beats brief.
This guy is hiking in the snowy mountains.
He comes across an avalanche warning sign.
There is nobody around but him.
A dumb expression forms over his face and he yodels.
Echoes roll but nothing nearby is moved.
At the top of the mountain the snow drifts twitch.
Guy, satisfied, hikes away from there still yodeling.
Frozen snow cracks.
Snow puffs billow and great slabs of ice crash down the mountain side.
Guy sees this and hightails it to safer ground.
Animals, people, are all panicking and getting pushed over by the rushing snow.
Cabins are destroyed.
The guy takes cover by an outcropping of rocks, fastens himself securely to the rock face, and waits for the avalanche to die down.
Avalanche dies down.
A lone bear shambles over from the other side of the mountain.
The bear goes to where a cabin used to be (only roof tiles are left). Bear sniffs a dish satellite.
Bear forlornly eats a food wrapper.
Bear tries to dig.
Guy comes down from the rocks he as climbing and sees bear.
Bear stops digging and sees him.
Guy runs.
Bear chases him down.
Bear eats the guy.
BEAT SHEET COMPLETED!!!
After the beat sheet, write up all the sound effects and speech bubbles and conversation/dialogue you want to be in your comic.
Since comics are a visual medium, highest priority is given to the beats. If a story can’t be told with the art without the dialogue– you messed up and it’s time to rethink your life choices.
Try to keep all your text chunks as short as a tweet. Professionally you don’t want more than 25 words per speech bubble and no more than 250 words per page.
Next is translating the beats to pages…
STRUCTURE OVERVIEW:
[1] point of entry, in media res, hero intro
[2][3] conflict. establish conflict, setting, and mood by the third page. [4][5] rising action/false resolution to conflict/investigation
[6][7] turning point/plot twist/epiphany (this one epic image, to page spread is pivotal, spend a lot of effort into creating this)
[8][9] aftermath/“darkness before dawn”/struggle [10][11] recovery/“rise and conquer”/“fall”
[12] resolution/final end/cliffhanger
[front cover][interior] [interior][back cover]
——————–
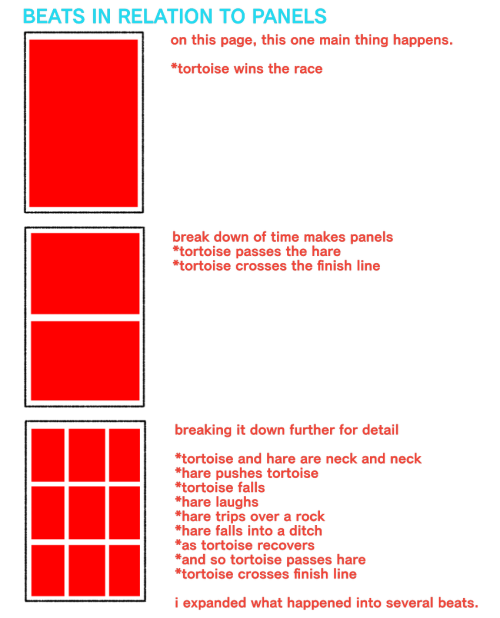
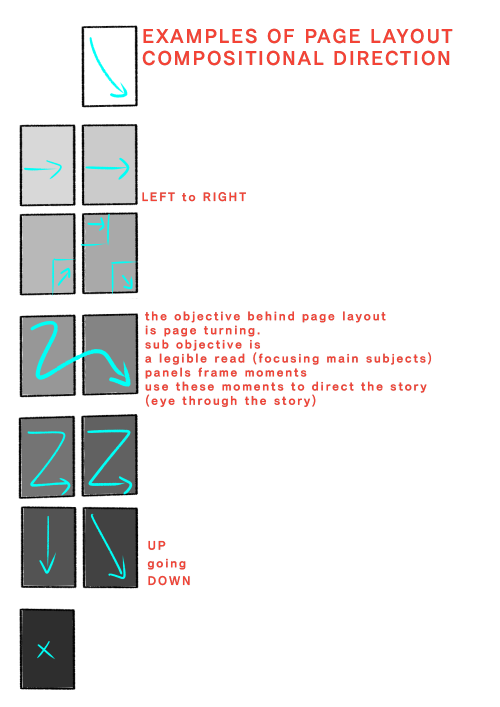
My maximum per page is nine panels but I’ve seen pages that have way more. I like to have about 3 to 4 panels per row or less but I’ve seen the “rules” broken before. Advanced comic book artists manipulate time with the number of panels and the size of each panel.
remember, DIAGONALS!!! open up an issue of batman, superman, spider man, deadpool or whatever youre reading theyre everywhere.

———-
…DRAW IN THIS ORDER:
Page 12,
Page 6 and 7 (this is typically one large image that takes up the space of two pages),
Page 1,
and then the rest.
ONLY “DEVIATION” ALLOWED:
Page 12 and 1*
Page 6 and 7,
and then the rest.
*Draw the first and last page as a spread in situations where the beginning of the story mirrors the end of the story.
Cover is dead last.
———-
(If at the very end you find out you need more pages and it’s absolutely unavoidable and totally necessary you have to add them in fours. Try to stick to 12 pages for this crash course.)
——————–
FURTHER NOTES:
Plan and draw the pages in spreads (the twos) since this is how it will appear in print and when you submit them to an editor for review guess what, the pages with an exception to the first and last will be reviewed as spreads.
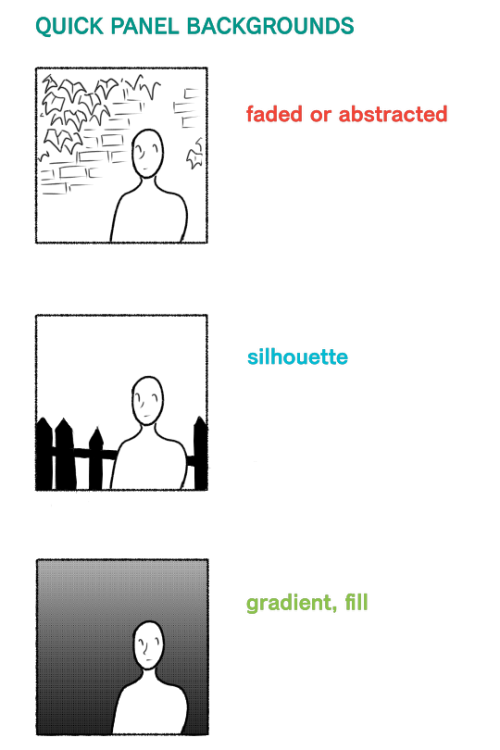
You at most only need one establishing panel of the setting and environment (scene) per page.
Forget “true to life” perspective outside of the establishing panel). Practice diagonal composition of objects and subjects within panels. For dynamism.
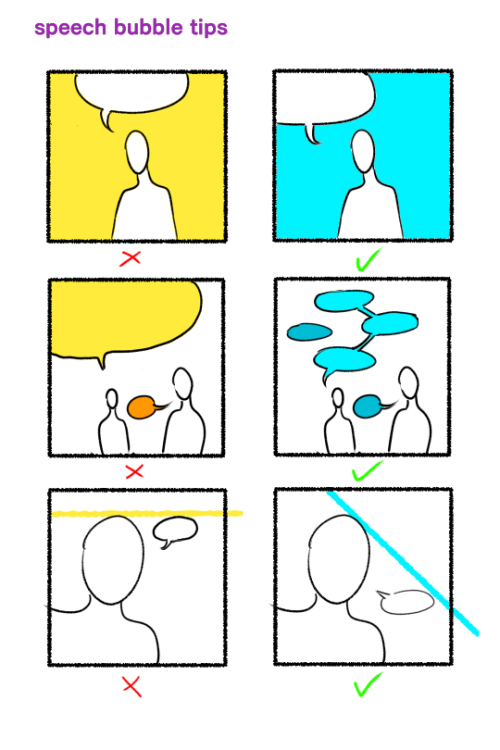
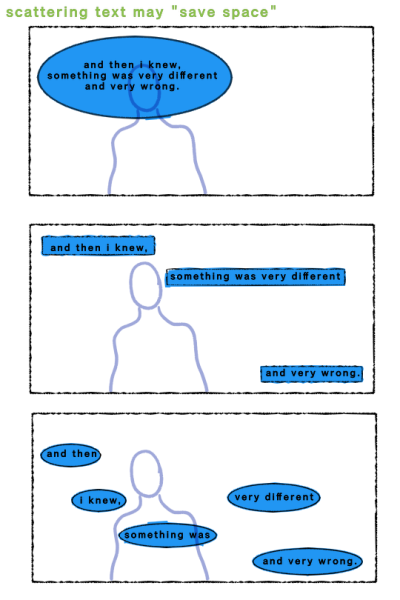
You don’t have to present the text all in one go (one paragraph or bubble). You can and should break up paragraphs, sentences, and if you need to single out words– to make smaller, more easily managed bubbles to scatter through the panel.
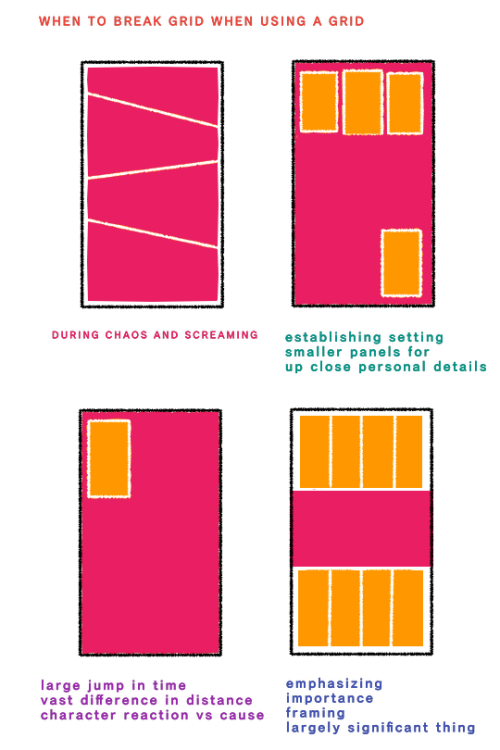
Less important moments have smaller panels and or lesser detail. More details (or more word bubbles) slow down time. More drawn detail also creates a concentration of values (it’s darker and sometimes combines together as one shape or mass)
Know your light sources. Control the blacks. Control the values.
TIPS | COFFEE? :3 | dA | IG | ♡ | ❤ | ⋆
(more coming soon 11/22/2016)


@desiringpirates all you had to do was to ask ;)
http://www.redbubble.com/people/addatheripper/works/24224465-btch-plz?asc=u


Someone asked me how I draw the skelebros, so…here’s a guide showing my process :v I definitely spent WAY too much time on this ahhahaha x__x but like, I used to tutor kids and this reminded me how fun it is to teach people stuff so its all good
😂😂😂😂


what color palette do you associate me with??

reply to this post and tell me?
Heeyy, so I'm a lowkey silent reader of Dear Ocean Goddess, and I was wondering if you could show us how you draw Tama? I'm not a very good artist myself, but I think it'd be fun to draw him.


Enjoy your tama! XD
OMG😆😍😍😍😍😍😍😍


xD
(Still using ideas from Thismightyneed Sorry!)
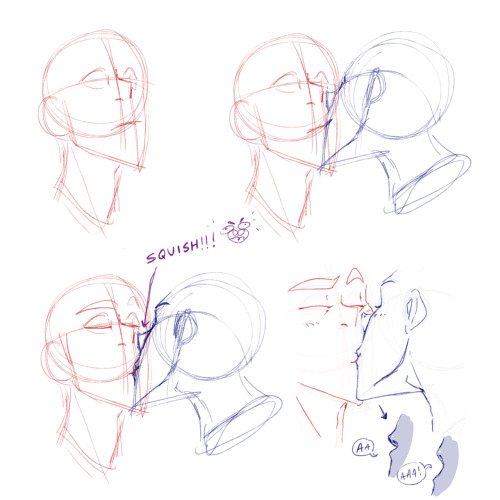
How I draw kisses!
A quick tutorial/cheat sheet on how I draw kisses!! I’m going to assume you already know how to draw a head and how to angle it, because that’s an entire procedure in itself. I’m going to focus on mainly the lips and also try and tackle some common mistakes when you’re first starting out.
Pursing the lips

So this is boring but crucial. If you don’t purse, their is no real kiss (take notes) bc placing your lips on top of someone else’s is not how you kiss… The most important part are the corners of the mouth, especially from the side view, because that’s what changes the most.
The actual kissing yeee
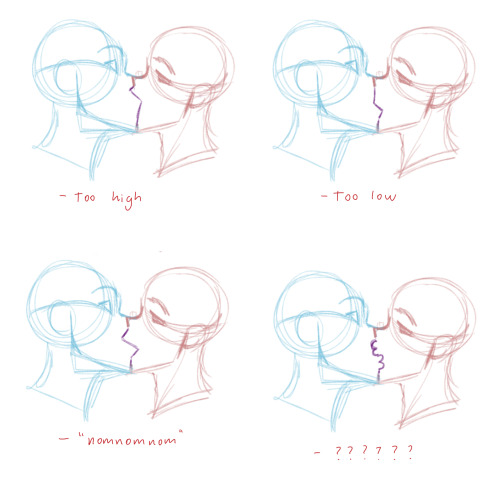
Let’s start do a basic side view kiss on the lips. And believe it or not, I think this one is the hardest!

Think about which parts of the face are going to be in front of the other! This can take some time to get the hang of, but once you get that down it’s easy. Also, focus on getting the heads at the right distance and angle. A common mistake is drawing them too close.
The Lightning Shape:

Still keeping in mind which part of the line is “Red’s” upper lip and which part is “Blue’s” lower lip, play around with the shape of the lightning. Very subtle changes can have a very strong impact! I usually go by feel, so take your time, but here are some things to look out for:
Details squishing etc.
So yeah once the lightning shape looks good, I usually add details and squish parts of the face that will touch. Which usually includes the noses, but from this angle they won’t squish unless you intend on making nice big noses <3. By now it should look something like this:

You don’t have to add the corners of the mouth! I usually do when I want to show that the character is smiling.
One technique used a lot in anime/manga + other cartoony art styles, is fading lines where two soft-ish objects press hard against each other. The picture above explains it.
Common mistakes
Getting down the crucial kissing part of fanart is hard and you will mess upp SO MANY TIIIIIIMES, but you learn from your mistakes, so don’t be discouraged. There are some things though that I frequently see when people draw kisses that makes it look awkward and stale, many of which I used to do myself. Here are some examples:
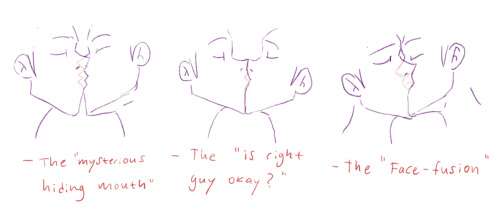
Try your best to avoid these. Most of the mistakes have little to do with the lips and more to do with the angle of the head. So getting that down before you move on to the lips is important.
¾ view Kissing
There are not a lot of angles where you actually see the lips meet (or at least not that I can draw…). Depending on how the heads are placed in relation to each other, you may or may not see the lips in a ¾ view. The way I have demonstrated is done in a way that the nose will bump into the other’s upper cheek.
Aaand that’s about it! These things will make more and more sense the more you draw them. At first it can seem very hard with so many things to keep track of, and it is, but practice makes perfect!
Rule of thumb: does the angle and position of the heads make sense? How are the lips going to align? What parts of the face are going to be in front of the other? How much will the lips purse? And finally, what is going to squish?
Thank you for reading! 😘

(☞゚∀゚)☞ now draw kisses
-
 king-troller liked this · 3 weeks ago
 -
 jarlsthegreat liked this · 1 month ago
 -
 yvonneuwu liked this · 3 months ago
 -
 holypopsymedlar reblogged this · 3 months ago
 -
 bubbles-and-things liked this · 4 months ago
 -
 folklore-fantasy-and-sci-fi liked this · 1 year ago
 -
 onejokes liked this · 1 year ago
 -
 grafitticreativity liked this · 1 year ago
 -
 anicacats2111meou liked this · 1 year ago
 -
 bruwudershaft liked this · 2 years ago
 -
 mothermayhem9 liked this · 2 years ago
 -
 bbbcakes6578547 liked this · 2 years ago
 -
 catgonecatty liked this · 3 years ago
 -
 petrichorparacosm liked this · 3 years ago
 -
 tootyrantlove liked this · 3 years ago
 -
 its-yasleepygal liked this · 3 years ago
 -
 thebestpansexual liked this · 3 years ago
 -
 the-aqua-fangirl liked this · 4 years ago
 -
 gtt2005 liked this · 4 years ago
 -
 willowworbler liked this · 4 years ago
 -
 al-melon liked this · 4 years ago
 -
 wulverarctos liked this · 4 years ago
 -
 forgottenvalor liked this · 4 years ago
 -
 gretchensinister reblogged this · 4 years ago
 -
 gayesterdanzu liked this · 4 years ago
 -
 ate-de-chocolate liked this · 4 years ago
 -
 bizarreselfie153 liked this · 4 years ago
 -
 celestriakle liked this · 5 years ago
 -
 candraz liked this · 5 years ago
 -
 lua-born liked this · 5 years ago
 -
 hunterboysbelt112 liked this · 5 years ago
 -
 mischiefandnightmares liked this · 5 years ago
 -
 tazeralien liked this · 5 years ago
 -
 book--wyrm liked this · 5 years ago
 -
gretchensinister reblogged this · 5 years ago
-
ziriconbejio688-blog liked this · 5 years ago
-
 bunnyfly5 liked this · 5 years ago
 -
 lovwwww liked this · 5 years ago
 -
 ask-a-pale-experiment reblogged this · 5 years ago
 -
 randomfandom4091 reblogged this · 6 years ago
 -
randomfandom4091 liked this · 6 years ago
-
 blumedic123 liked this · 6 years ago
 -
 wait-whaaaaa reblogged this · 6 years ago
 -
wait-whaaaaa reblogged this · 6 years ago
-
 nightmare-springtrap liked this · 6 years ago
 -
 littlepurpleplanet liked this · 6 years ago
 -
 prettiest-pansexual-princess liked this · 6 years ago